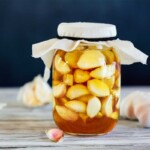
Fermented Garlic with Honey
Ingredients
- Organic raw white garlic
- Raw, unpasteurized honey
- A clean glass jar with a lid (sterilize the jar)
Instructions
- Step 1 – Preparing the ingredients: Select fresh garlic bulbs (make sure they are organic). Peel the cloves and set them aside. Ensure that the garlic cloves are free from blemishes and are not sprouting.
- Step 2 – Filling the jar: Take a clean Mason jar and start filling it with the peeled organic garlic cloves. Fill the jar to about half or two-thirds full.
- Step 3 – Adding honey: Pour raw honey over the garlic cloves in the jar. Ensure the honey completely covers the cloves.
- Step 4 – Mixing the ingredients: Stir the mixture with a clean spoon to remove air bubbles and ensure that the garlic is fully coated with honey.
- Step 5 – Sealing and storing: Seal the jar tightly. Then, leave it on a countertop in a dark place at room temperature.
- Step 6 – Fermentation process: Fermentation begins within a few days. You may notice bubbles and the honey may become more liquid – this is a good sign. Stir the mixture every day for a month to ensure all garlic cloves are coated in the honey.
- Step 7 – Ready to use: After a month, the fermented garlic in honey is ready to use. It can be stored at room temperature or in the refrigerator.
Notes
IMPORTANT: it’s vital to ensure the garlic is completely submerged in its brine during storage. Exposure to air could lead to the growth of harmful bacteria, which could spoil the fermentation process, reducing its shelf life and safety.